

There are four chief types of boat adhesive sealants: polyurethane, polyether, polysulfide, and silicone. Knowing which sealant is best for each project and its proper application procedure can be the difference between a seal that lasts and a seal that fails.
Choosing the Right Sealant
Polyurethane is the strongest adhesive sealant. For permanent fixtures either above or below the waterline, this is what you’ll want to use. It is often used in deck fittings and through-hulls but rarely on the sole or deck itself, since certain cleaning products may attack it. Polyurethane is also not compatible with some plastics, including Lexan and polypropylene, and may damage them.
Polyether is another sealant with tenacious adhesive properties. It bonds well to metal, wood, and glass, making it a great bedding compound. Its ability to stand up to inclement weather and temperature extremes is also a big benefit. However, although some polyether products will secure Lexan, they can be harmful to other plastics.
Both polysulfide and silicone are called adhesive sealants, but their adhesive properties are much weaker than those of either polyurethane or polyether. Polysulfide is one of the only sealants still commonly sold as a two-parts formulation. Primarily polysulfide is what you’ll use for deck seams or other fixtures aboard that require a rubber-like seam to ensure flexibility. But for all its versatility, polysulfide has one major drawback: It eats plastic.
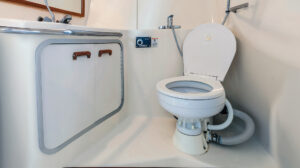
On the other hand, silicone will stick to plastics nicely and is usually the right choice if you want to embed plastic items. Silicone also provides a superior barrier to electrical conductivity and is suitable for forming gaskets. However it’s important to remember that silicone is a temporary sealant; be prepared to reseal exposed or high-use silicone seals at least once or twice a year.
Application

These tubes are great for small jobs in easy-to-reach places, but for more time-consuming work, be sure to go with the cartridges.
The first step in applying any adhesive sealant is to prep the area. To begin, remove any old or weathered sealant. There are myriad tools by which you can accomplish this, ranging from the simple and time-consuming single-edged razor blade to the powered—and still time-consuming—skill saw. Heat knives are also an option, especially when dealing with polyurethane and polyether, but be sure that the work area is properly ventilated, and wear a respirator; many sealants when heated can generate toxic compounds that you do not what to inhale.
Take your time removing the old sealant, especially in highly visible areas where errors may be both noticeable and expensive to remove. Sharp blades have a tendency to slip and cut into abutting woods, but don’t fret if this happens; the new sealant will conceal most small nicks.
Grind out the last bits of the old sealant with a rotary tool or, for difficult-to-reach or sensitive areas, try sandpaper. Even when all of the the old sealant is removed, many substrates may require mild abrasion to ensure a good bonding surface. Even if the one you’re working with doesn’t, a light scuffing with high-grit (220 and up) sandpaper or a Scotch-Brite pad will help your new sealant get a good grip.

It’s important to choose the right type of solvent for a thorough clean-up.
Now that you’ve prepped the groove, it’s time to protect everything else around it—including yourself—from the adhesive characteristics of the sealant. Wear old clothes, safety glasses, sunscreen, a respirator (especially if you’re not in a well-ventilated area), and protective gloves. Make sure to don all your protection before you start the process, because if you don’t, this stuff will stick to whatever it touches, and it’s a real hassle to remove. Layering gloves is also a good idea, allowing you to simply roll off a dirty pair and have a clean pair underneath. If you’re not careful, you will need to change gloves often, especially if they’re latex, which is one reason why 3M recommends wearing stronger nitrile gloves instead.
Although many people may find it optional, I always mask everything. Taking the time to precisely tack down one roll of blue painter’s tape saves you from the grief and frustration of getting adhesive off teak. The only time I refrain from masking is when I caulk seams on slick surfaces, like porcelain, that clean easily or on objects that come together at acute angles where masking may be more of a hassle than wiping up splotches.
One trick I’ve learned to keep the mess under control is to have a small pail of rags handy. Soaking them in solvent is a good idea, but the solvent you choose depends on which sealant product you’re using. If it’s polyurethane, you’ll want to use a nonpolar solvent like mineral spirits; 3M’s General Purpose Cleaner will also do the job. However, if you’re using polyether, soak your rags in an alcohol-based polar solvent like isopropynol or acetone. Never use alcohol with any moisture-cured adhesive sealant because it will prevent cross-linking and curing.

These little tools from Star brite aid in application and removal.
Wipe the area with some of the rags, paying special attention to remove dust particles. The rags will not only clean the area but also act as a primer and pull out any oils—such as those found in teak—that interfere with the drying process. Speaking of drying, make sure that the surface is moisture-free, since water can also interrupt curing. Don’t wipe primers on surfaces that are you are not planning on joining, as they will soak up the natural wood-preserving resin. If you’re sealing an area that flexes, such as a deck or a sole, you only want the sealant to adhere to the sides of the groove and not to the bottom. Packing in a layer of cotton will keep the joint flexible, or if there’s not enough room for cotton, a long bit of paper ribbon will do the trick.
Once all the prep work is complete, it’s time to lay down the sealant. For one-part cartridges and tubes, there’s no mixing; a two-part concoction requires hand-stirring (don’t use an electric stirrer because it may add bubbles) until they’re completely mixed, a process that usually takes about five minutes. Pour the mixture into the cartridge, and like a nurse with a hypodermic needle, tap the cartridge until you remove all the air bubbles. You don’t have to do this with one-part cartridges, since the companies go to great—and proprietary—lengths to ensure their products contain no air.
Measure the groove, and then cut the tip of the cartridge at a 45-degree angle so the opening matches the groove. Be sure the cartridge is already in the gun before you try to cut the tip. Pull—never push—the gun along the groove width, filling the groove just a little over the top. Pushing may cause air bubbles, blemishing the joint. If you spot an air bubble, lance it with a small piece of wood or metal, or add in a small drop of sealant afterwards. As you go, press on the trigger handle of the caulking gun with steady pressure, and pull the gun along at a steady pace. If you have to remove the gun from the groove, you may find that you’ve built up quite a bit of backpressure, resulting in a continuing flow of sealant. Pulling back on the plunger and releasing the pressure from the gun will halt this overflow sooner. However, if you purchase a battery-operated or pneumatic caulking gun, these will automatically back off the pressure and stop overflow as well as offer a constant bead flow. If you want a truly professional-looking job and have the money to spend, either is worth considering but often unnecessary.
Once your joint is laid, it’s time to remove the excess sealant. Some people will use their finger, but for those who prefer to keep their gloves clean, a tooling device such as Caulk-Rite trowel or even a tongue depressor is the way to go. Spraying a lubricant onto the seam will act as a tooling aid and potentially give you a smoother seam. You can purchase a lubricant spray for your project or just use the same polar or nonpolar solvent in which you were soaking the rags. Wipe all excess sealant from the area and then remove the masking tape by pulling it off at a 45-degree angle. Make sure you remove the masking tape before the skin begins to form on the bead, or the masking tape may become embedded in the bead.
You should get a fine seal if you follow these steps, but remember that a “perfect,” bubble-free seal requires both skill and finesse. The only way to achieve it is with experience and patience. Go slow, plan ahead, and try to keep your working area and yourself as clean as possible. I don’t think I’ve ever laid a seal without exclaiming once or twice over how unwieldy the stuff can be, but as far as I’m concerned, the fulfillment in seeing a great-looking seam is even better than the sheen of a new coat of varnish.
3M
(877) 3M-MARINE
BoatLIFE
(843) 566-1225
Star brite
(800) 327-8583
This article originally appeared in the April 2008 issue of Power & Motoryacht magazine.