


Story and Photos By Capt. Vincent Daniello
Intro: Propeller-shaft stuffing boxes—often the only holes below the waterline without a valve—can quickly deteriorate from a slow drip to pouring water. Repacking your own isn’t hard when the boat is out of the water, and once you’ve done it, emergency in-water repairs aren’t hard either.
Step 1: Two parts of a stuffing box squeeze rings of packing around the shaft to form a seal. It’s tightened until it leaks a tiny bit of water to cool packing heated by a spinning propeller shaft. Too much heat hardens packing and makes it leak, and regular over-tightening wears shafts. A longer or shorter hose moves the packing to a new area of shaft, but check with a prop shop on how deeply the shaft can be worn, as this varies by horsepower, prop size, and transmission reduction. “Over 90 percent of the calls I get are because a stuffing box is too hot, either from over-tightening or using oversized packing,” says Steve Gaston, executive vice president of stuffing-box manufacturer Buck Algonquin (www.buckalgonquin.com). Unfortunately, packing sizes aren’t standard among manufacturers.
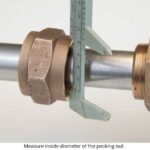
Step 2: Gaston suggests measuring the inside diameter of the packing nut or gland, subtracting the outside diameter of the shaft and dividing by two—in our case the 1¾-inch nut less a 1¼-inch shaft requires ¼-inch packing after you divide by two. You’ll want at least four times the circumference of the shaft.
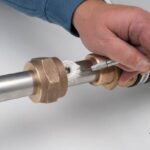
Step 3: The hardest part of the job is often getting the old packing out. A corkscrew packing extractor is easiest, although any hooked tool will do. Be careful though not to damage bronze stuffing-box threads with steel tools.

Step 4: Cut three rings of packing with a sharp utility knife using the shaft to measure length and also to find the correct angle for both cuts to meet along the arc of the shaft. If it’s even slightly long, the packing won’t fit into the stuffing box—a tiny gap is fine.

Step 5: Work each ring into the stuffing box with a blunt tool—a ¼-inch socket extension works well.

Step 6: Thread the nut on after each ring to drive packing in, and use a mirror to check progress

Step 7: All three rings will compress nicely into the stuffing box.

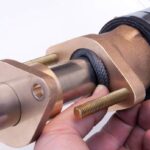
Step 8: A spud-type stuffing box is threaded with one large nut that contains the packing.

Step 9: A gland-type stuffing box is smooth inside, and packing is compressed by tightening nuts on a pair of threaded studs.
Step 10: Start the packing by hand and use the insert to push it in.
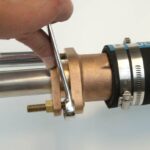
Step 11: Tighten nuts evenly to keep the two faces roughly parallel.

Step 12: Tighten either spud, or gland-type stuffing boxes just beyond hand tight while out of the water, and lock the nuts together.
Conclusion: Check the stuffing box in the water while still in the travel lift slings, but run the boat at cruise RPM for at least ten minutes before final tightening. Once back at the dock, Gaston likes to see at least one visible drip of water every ten seconds. With correct engine alignment and straight shafts, a stuffing box should drip steadily while underway and be at least perceivably damp after the boat sits overnight.
Most in-water emergencies can be solved by adding one ring of packing to the three worn rings already in the stuffing box. Be sure to repack it completely at the next scheduled haul-out. The water that comes in while adding that ring is disconcerting but manageable—especially if you know what to expect after repacking the stuffing box at least once in the boatyard.


