It’s a beautiful summer afternoon. While moving from the foredeck into the cockpit, you step on a patch of smooth gelcoat between areas of nonskid. You slip, lose your balance and reach for a handhold. But it’s not there: To save a few bucks, the boatbuilder left off a grab rail right where one should be. So you do a triple axel into the water. You then discover that the ladder on the swim platform is too short, and there’s no handhold to help you pull yourself back aboard. Your flailing and splashing attracts sharks, who eat you. Bereft of your command, your boat, with your beloved family on board, slowly drifts away over the horizon, never to be seen again. Another happy day ends in tragedy.
Okay, maybe this scenario is exaggerated—sharks rarely eat people, and somebody in your family probably knows how to use the VHF. But the rest of it could happen. Falling, whether onto the deck or over the side, is no joke, and it’s even less funny as we get older and our bones get brittle: A broken hip can ruin a whole summer—or your life. No boat has enough places to grab onto, especially fast boats and/or boats carrying older people who are unsteady at the best of times. Spend a few bucks and a couple of hours now to improve your boat’s safety. Install extra grab rails, and make sure your re-boarding ladder is actually usable. These are easy improvements almost anyone can do themselves, and they don’t cost a fortune, either.
And if you do the job yourself, don’t let your DIY-ing make your boat non-ABYC (American Boat & Yacht Council) compliant. Reputable builders have followed the comprehensive ABYC Standards for boatbuilding for decades. These Standards were developed by experts in construction and boating safety, and adhering to their requirements results in better boats. When you add something to your boat, like a grab rail, follow the ABYC requirements. Not only does that mean the rail will be properly installed, but it also keeps your boat compliant, which can be important if your insurer demands an inspection, or you sell the boat and the buyer hires a competent surveyor. The Standards are available to all ABYC members, and anyone can join: Annual dues for recreational boaters are $200/year.
ABYC Standard H-41, “Reboarding Means, Ladders, Handholds, Rails and Lifelines,” lays out the requirements, and they’re straightforward. Basically, any grab rail from a reputable marine supplier that an adult hand will fit through will meet the Standard. What’s left to the installer is the requirement that all handholds, including grab rails, can withstand 400 pounds of load in any direction without failure. This means using the correct fastenings when adding handholds—usually machine screws and nuts. Never use wood or self-tapping screws.

Make Mine Stainless
Some traditionalists like teak grab rails, but I prefer stainless steel: They don’t need varnishing or oiling. Look for 316 stainless-steel rails, the best stainless for marine use. I found quite a few grab rails online made of 304 stainless, which is fine for use away from salt water, but 316, which contains molybdenum along with chromium and nickel, is more corrosion resistant. Use 316 stainless fasteners, too. Some grab rails have an integral threaded stud welded onto each end; others have a plate that takes multiple machine screws. In either case, buy large-diameter fender washers to place under the backing nuts and lock washers to distribute the stress of the fastening. The fender washers will provide enough tear-out resistance that the person clinging to the rail will lose his/her grip before the rail comes loose.
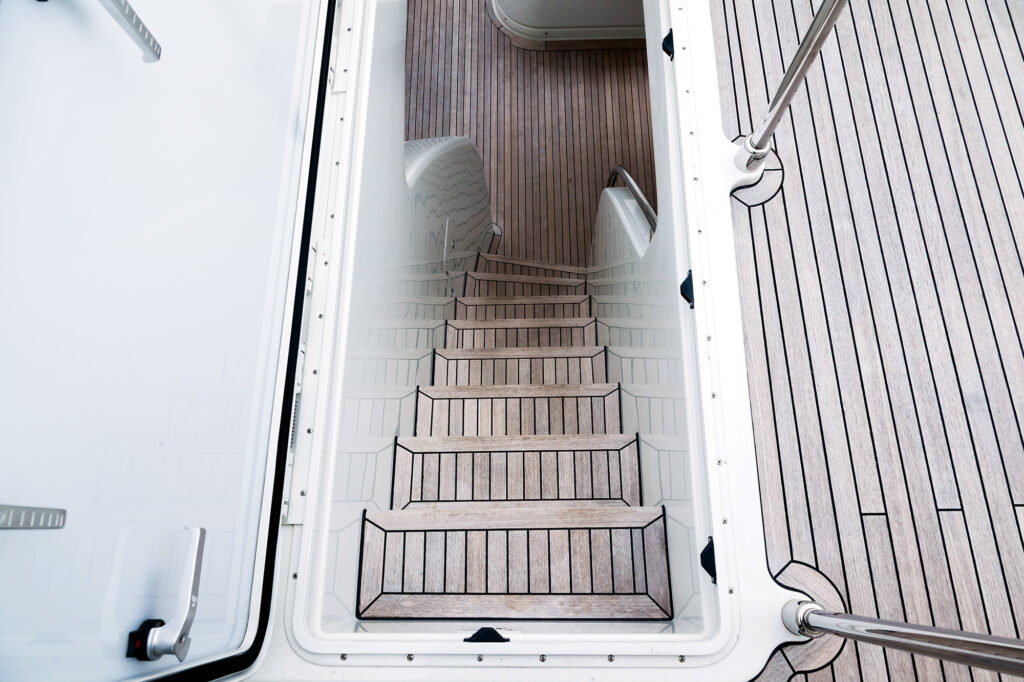
Where do you put the grab rails? Walk around your boat and whenever you unconsciously reach out for something to hold onto that’s not there, that’s where one should go. Maybe you should have an extra grab rail on the radar arch, for example, or on the side of the cabin where you step onto the foredeck. Every boat I’ve owned has benefited from an extra grab rail at the helm, for the passenger to hold onto when the weather turns choppy and/or I’m leaning too hard on the throttle. Don’t forget to add handholds belowdecks, and in the head, too. Things get slippery in there, and a large wake might knock Grandma down without something for her to grab. Experience will tell you where to position the grab rails; choose sites with sturdy structure to hold the fastenings.
The Hole Truth
Sometimes the back side of the mounting surface isn’t accessible for installing the fender washers and nuts. (Maybe that’s why there’s not a grab rail there already.) You might have to cut an access hole big enough for your hand, then install a deck plate to close it, which makes the project more complex. But you’ll have access for adding other things in the future, so it’s not all bad. Sometimes the nuts show; if you find exposed hex nuts unattractive, replace them with cap nuts. I think simply trimming the machine screw almost flush with the hex nut is just as pleasing aesthetically.
When you drill the mounting holes, countersink them slightly—just into the gelcoat, not the underlying laminate. This provides space for the bedding to be pushed down around the bolt, making a better seal. It also keeps the gelcoat from cracking when the fastening is tightened. If the laminate is cored, coat the inside of drilled holes with resin or epoxy to seal it from water intrusion. The ideal method is to drill the hole oversized, fill it with thickened epoxy, then re-drill the correct size hole for the fastener. Not many people take this much time and trouble. Sealing the raw edges of the core is especially important on deck and in the cockpit, less so below in the cabin. It’s a pain to mix resin to get just a couple of thimblefuls to seal holes, But do it anyway—water getting into cored laminate is never good.
Bed the grab rails with polysulphide sealant, e.g., BoatLife Life-Calk, 3M 4200 polyurethane or butyl tape. Many experts prefer butyl tape—it’s easier and neater to use, doesn’t have to cure, and can be removed easily when necessary. I use polyurethane, and bed both the fitting and the fastenings themselves to get some sealant under the bolt heads. Mask around the fitting to make removing the excess easier. Don’t be shy with bedding: It’s better to clean off the overflow than to leave gaps where water can sneak in.
Stop the Skid
Footing on fiberglass isn’t always secure, even when the surface is nonskid—maybe it should be called “less-skid.” It’s even worse if the nonskid is dirty, or has been waxed, so keep it clean. And slick strips between areas of nonskid can send you flying, too, especially on molded-in steps and side decks. Wooden decks provide better footing than ‘glass, hence the preference among old-timers for teak. But teak’s expensive, and a pain to keep up.
Foam decking, the stick-on kind that’s easy to apply, provides better footing, takes less maintenance and is cheaper than teak. You don’t have to cover the whole deck, just critical areas where feet are prone to slip—steps, side decks, swim platforms and so forth. Foam decking at the helm makes standing for long watches at the wheel a lot easier on your feet, too. Any of the stick-on foam materials should do the job. Most manufacturers offer many colors and styles, including at least one that looks like teak. We’ve covered foam decking here at Power & Motoryacht in past issues; do a search on the website to read all about it.
Get Me Back Aboard!
ABYC Standard H-41 calls for every boat to have a permanently mounted ladder, deployable by the person in the water, to provide unassisted reboarding from the water. It also must have a weight capacity of 400 pounds, the lowest step must be at least 22 inches below the waterline and there should be handholds “or adjacent boat structure” to assist persons when reboarding. Make sure your ladder meets these requirements—many do not.
And even if it does, try this: Pick a warm day, anchor your boat and jump overboard, fully dressed; take your phone out of your pocket first. Now deploy the ladder and climb back aboard. Was it easy? Now imagine that under stress, shock and/or in cold water after not deliberately taking a plunge. Is 22 inches below the waterline really deep enough, or is it hard to get your foot on the lowest rung and then haul yourself up? (I’m not as limber as I once was, and for me 36 inches would be easier.) Did you use the anti-ventilation plate on the outboard as the first “rung” of the ladder, as I had to do on my last boat? Was there a handhold within easy reach from the ladder? (Some deluxe ladders have integral handholds that deploy when you unfold the ladder.) If your ladder’s hard to use, re-think it now, before you need it. Maybe it’s time for an upgrade.
I like dive ladders. They’re designed for ease of use by folks wearing wetsuits, fins and air tanks, so they’ll be easier for creaky old fogies like me (and maybe like you, too) to use. Sure, they cost more—I found a telescoping, 316 stainless-steel dive ladder for almost $600 vs. less than $150 for a standard reboarding ladder. But that won’t seem so expensive when you’re trying to extricate yourself from the drink and the sharks start circling. An extra handhold might be useful then, too. Add one now, before you become someone’s dinner.
Learn how to maintain the stainless steel on your boat here >>
This article originally appeared in the June/July 2025 issue of Power & Motoryacht magazine.