
The rather erudite Chapman Piloting & Seamanship describes the bowline as the most-used knot onboard the typical recreational boat. So if that is the case—and it certainly is onboard Betty Jane II—you gotta wonder why it is that so few recreational boaters know how to quickly and efficiently tie this supremely practical bit of nautical grooviness and why Chapman doesn’t properly illustrate the methodology involved.
Oh yeah. There are folks out there who can tie a bowline in the dark, or behind their backs, or under high-pressure situations when they’ve gotta be thinkin’ about something else while they’re manipulating the bitter end of what’s become a seemingly all-important length of three-strand nylon. But I gotta tell ya: they are few and far (like many nautical miles) between.
I learned how to correctly tie a bowline from a bosun on the Roger Blough, a grand old ship that, as far as I know, still busies herself upon the Great Lakes today. The old guy guffawed at my rabbit-hole knot-tying methods (which I’d learned from a book, I guess), then by way of commentary tacked on several lines of the purple prose he was famous for, to the merriment of a mate, a few deckhands, and some other members of the crew.
“That what they teach you in them maritime academies, kid?” he growled just prior to initiating an on-deck course in practical (and I do mean: practical) seamanship, with me as the only student. “Huh!”
No foolin’! The experience put me off books, at least as they apply to knots, bends, and hitches, for decades to follow. And, to this day, I don’t even think about rabbits while tying this eminently efficacious knot. Too academic.
How to Tie a Bowline with Your Eyes Closed
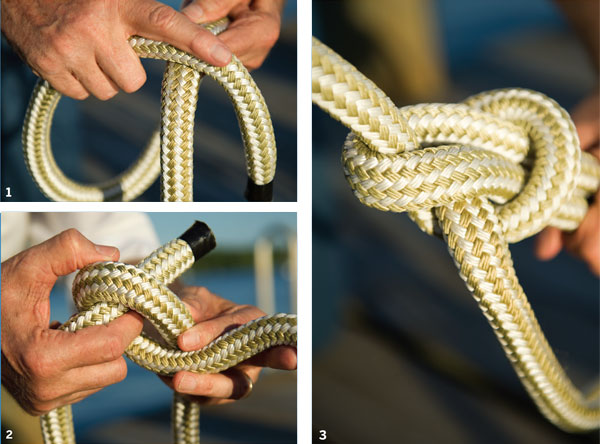
The rabbit-comes-out-of-the-hole method of tying the most important knot of all time is not tolerated on commercial vessels. The bowline can be used to make giant loops, temporarily fasten lines together, lift heavy objects, and serve a host of other purposes onboard. It’s greatest virtues are its strength, the ease with which it can be composed in the dark or without looking, and the ease with which it can be pulled apart. Begin by crossing the standing part of the line with the bitter end (1) and then (if you’re right-handed) doing a two-handed maneuver that’s admittedly complicated. As the index finger of the right hand guides the bitter end of the line down, the backs of the fingers of the left hand slide across under the standing part and lift (2), thereby forming a loop. While all this is going on, the right forefinger forces the bitter end up through the loop almost parallel to the standing part, which is now held straight up with the left hand’s forefinger. Completing the knot is straightforward. You merely go around the backside of the straight-up standing part with the bitter end and then go back down through the loop. Tighten (3) by simultaneously pulling on the standing part at the same time you pull on the bitter end and the portion of the knot it adjoins. The point here is to get so you can tie this knot automatically and fast, without looking.