

Your boat’s engines depend on lube oil and fuel for smooth, steady operation. Your crew needs frequent doses of fresh water to keep them hydrated. Each one of these fluids must be scrupulously clean, so all should pass through a filter—sometimes more than one-—and every filter should be changed regularly. It’s a pain in the backside, but dirty filters can lead to trouble, often of the expensive variety. So do yourself, your boat, and your crew a favor: Change your filters.
You’ll find oil and fuel filters on each engine (don’t forget the generator), fuel filters on the gasoline or diesel lines leading to the engines, and freshwater filters under one or all faucets, and at the icemaker in the wet bar. (Nobody wants bad-tasting ice.) One project for this summer is to go through your boat, locate all the filters, and log them with the specs for each replacement cartridge. (Read the various owner’s manuals for clues where to find your filters.) Buy a spare for each filter, and maybe two for fuel filters, which can pack up at any time, especially if you haven’t cleaned your tanks recently.
No Tools Required
Changing filters is basically the same simple procedure, no matter what fluid runs through them: Remove the old filter and replace it with a new one. It doesn’t take advanced mechanical skills or specialized tools. The hardest part is often not spilling anything, especially with oil filters, often located where it’s near impossible to remove them without slopping dirty oil onto the engine and into the bilge. Have lots of rags and paper towels handy. Disposing of used filters, and the dirty oil and fuel they contain, can be a problem, too. Plan ahead so you don’t pollute.
Most oil and fuel filters come in one of two types, both consisting of a paper-filter element inside a metal housing. (Some outboard motors have inline filters under the cowling, or proprietary filters with bayonet mounts; read your owner’s manual.) Spin-on filters are more common on modern engines. Changing one requires simply unscrewing the old filter and screwing on the new one, changing both the housing and element together. Couldn’t be easier. Sometimes you can remove the old filter by hand, but usually you’ll need an inexpensive filter wrench (about $15). The one thing to remember is to coat the gasket on the new filter with oil so it seats properly. You screw it on hand-tight.
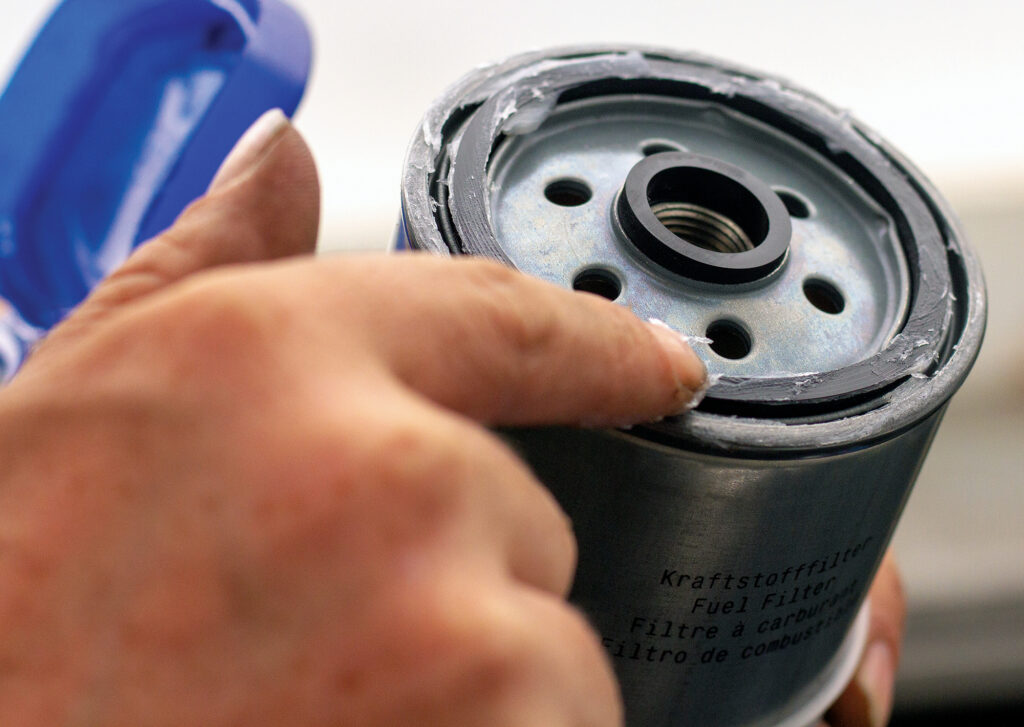
Cartridge filters, on the other hand, consist of a metal or, sometimes, plastic canister with a separate filter element inside. You open the canister—sometimes you need a wrench for this, too—and replace just the element. Have a receptacle handy; The old element’s full of oil/fuel, and it’s easy to spill. If you can drain the canister before opening it, the job is less messy. Drop the used element into a heavy-duty zip-lock bag.
You can see the state of the used fluid with a cartridge filter. Is it really dirty, full of sludge, etc.? This gives you an idea of what’s happening inside the engine or fuel tank. You can learn this from a spin-on filter, too, but you have to cut it open. A better way is to take a sample of the used oil and send it to a lab for analysis. It’s an inexpensive (usually under 50 bucks) procedure that’ll tell you way more about what’s happening inside your engine than simply looking at a dirty filter element. You can send fuel and even coolant for testing, too. An internet search will turn up a slew of labs; Blackstone Laboratories is a good one. Most labs will send you a sampling kit free of charge.
Separate the Water
It’s rare that you have to change an oil filter unexpectedly while under way. That’s not the case with fuel filters: Algae and/or sludge from dirty tanks; water from condensation, leaking deck fills or poorly filtered fuel from the fuel dock; owner inattention to the filter replacement schedule; or even Divine intervention can clog a filter and stop the engine at any time. It’s more common during rough weather when the fuel’s stirred up by the boat’s exuberant motion, just when you don’t want to lose the engine. This never happens with a marine store nearby, so you need to have spare filters onboard. Keep your fuel tanks clean, and protect your engine from contaminated fuel with an up-to-date primary fuel filter/water separator.
Getting the water out of the fuel is more important today than in the past, especially with gasoline engines. Today’s ethanol-blend gasoline will pick up and hold more water than “pure” gas, so it’s more likely H2O will find its way into the engine—not a good thing. Mechanics have always protected diesel engines with a water separator along with a primary fuel filter; now it’s important for gasoline engines, too. Most primary fuel filters sold today incorporate both a filter and a water separator.
In most filter/separators, the fuel flows inside the canister in such a way that water is removed by centrifugal force, and drips into an empty space at the bottom of the canister. Better filters, e.g., Racors, have a clear sight bowl on the filter that lets you see and even drain water—convenient, but unfortunately not allowed per ABYC rules for use in the engine room unless it has a metal shield. Otherwise, the plastic bowl could melt in case of an engine-room fire. (The filter has to have two-and-a-half minutes of heat resistance.) Only thing is, the metal shield makes it harder to see water in the bowl, and to access the drain, which also has to be fireproof. (Yes, there are thousands of boats on the water that violate this regulation.) Filters mounted outside the engine room, for example on an outboard-powered boat, can use plastic sight bowls without shields; they’re a better choice than simple spin-on fuel filters.
Install a vacuum gauge on your fuel filter to warn if it’s getting clogged. Vacuum increases as the filter cartridges block up. Run the engine wide open under load with a clean cartridge to determine the baseline vacuum reading, then monitor the reading as you rack up engine hours. When the vacuum reaches the maximum recommended for the engine, as listed in the manual, change the filter. On some Racor filters, you can simply replace the standard T handle—the one you use to open the filter to remove the element—with one that incorporates a vacuum gauge. They cost about $125.
Change your fuel filters at the start of every boating season. Do it yourself—someday you’ll have to change one at sea, so it’s better to know how. If there’s a drain, empty the filter first to minimize the risk of spilling fuel. Spin-off filters rarely have drain plugs, so I position a container under the filter before unscrewing it—a bucket is best, but even a coffee can will do. Dump the old fuel into a clear container so you can check it for water and/or dirt, then dispose of it properly. Wipe up any spills right away, especially gasoline spills. Some mechanics fill the primary filter with fuel when reassembling it, to make it easier to get the engine running correctly again. Don’t fill the secondary filter, the one on the engine: It should get its fuel only via the primary. Read the manual for your engine’s exact procedure.
Diesel engines usually require bleeding of the fuel system to remove any air that got into the lines during the filter change. This can be a pain, and on older engines involves cracking open the fuel lines from the injector pump to each injector. Some diesels are self-bleeding—the electric fuel pump does the work. Newer, common-rail diesels don’t have to be bled; you pump fuel up to the secondary filter using the manual pump on the engine, then crank the engine until it starts. (Read the manual for precise info on this.) Never open the fuel lines on a common-rail diesel: Fuel in them will be under lots of pressure and can inject diesel through your skin. The only thing you should open on the engine is the secondary filter, when you replace the element.
Don’t Drink Dirty Water
If your boat’s freshwater system isn’t filtered to provide palatable and potable drinking water, install a filter now. Drinking water bottled in plastic, as many of us have been doing for years, isn’t good for the old corpus, science tells us now: Microparticles of plastic gradually accumulate in our bodies, along with various other contaminants. Drink from glass or stainless-steel containers. Your body will thank you down the line, and you won’t produce so much plastic waste.
Water filters on your boat work just like the one you might have at home. The water runs through a filter, usually carbon, that removes impurities and improves the taste of the water, which can get a little funky from sitting in the tank. You can install a simple system, consisting of only a single canister under the sink, or a more complex setup with two-stage filters, UV-light treatment to kill bacteria, and so forth. If you get your water from questionable sources—maybe you’re cruising way off the beaten path—you’ll want a more capable system. For most of us, a simple filter will do.
Compared to oil and fuel filters, changing freshwater filters is child’s play. It doesn’t matter if you spill some liquid, there’s no pollution issue when disposing of the old canisters, and the new filters often click into place with just a twist. Start every season with fresh filters, and don’t hesitate to replace them if the water starts to taste unpleasant. Run a couple gallons through the new filter to flush out any loose carbon and you’re good to go.
Add bleach to your water to keep it clean; experts say about a teaspoon per 50 gallons will do, a little more if you’re unsure of the water you’ve taken aboard. Don’t let water sit in the tank long enough for algae to grow, or you’ll clog not only your filter, but also your water pump. If the tanks are that gunky you shouldn’t be drinking the water anyway; no filter is that good.
Taking care of your filters will take care of your fluids, and your fluids will take care of you. It’s easy, inexpensive, and someday will keep you from having to call for a tow. Finally, I’ll say it one more time: Read the manual to find out how to maintain the filters on your particular engine.

Is There Sulfur in Your Fuel?
Until 20 years ago, give or take, diesel fuel sold in the U.S. typically contained 500 parts per million (ppm) of sulfur, and sometimes more: The diesel we burned back in the 20th century typically had 5,000 ppm sulfur. Some countries still burn high-sulfur diesel, so oil analysis is especially important if you spend time cruising in foreign waters, particularly in Latin America. High-sulfur fuel produces sulfuric acid when burned—the acid attacks vital components, like bearings, and over time will increase engine wear. Oil analysis will identify high acid content in the used oil, along with a bunch of other anomalies. If it does, it’s important to change the oil on schedule. Today all U.S. diesel has ultra-low sulfur content (no more than 15 ppm), so acid’s less of a problem if you stay Stateside—but it’s still important to change the oil at the interval specified by the engine manufacturer. If you store your boat for the winter, change the oil at layup.
This article originally appeared in the August/September 2025 issue of Power & Motoryacht magazine.


